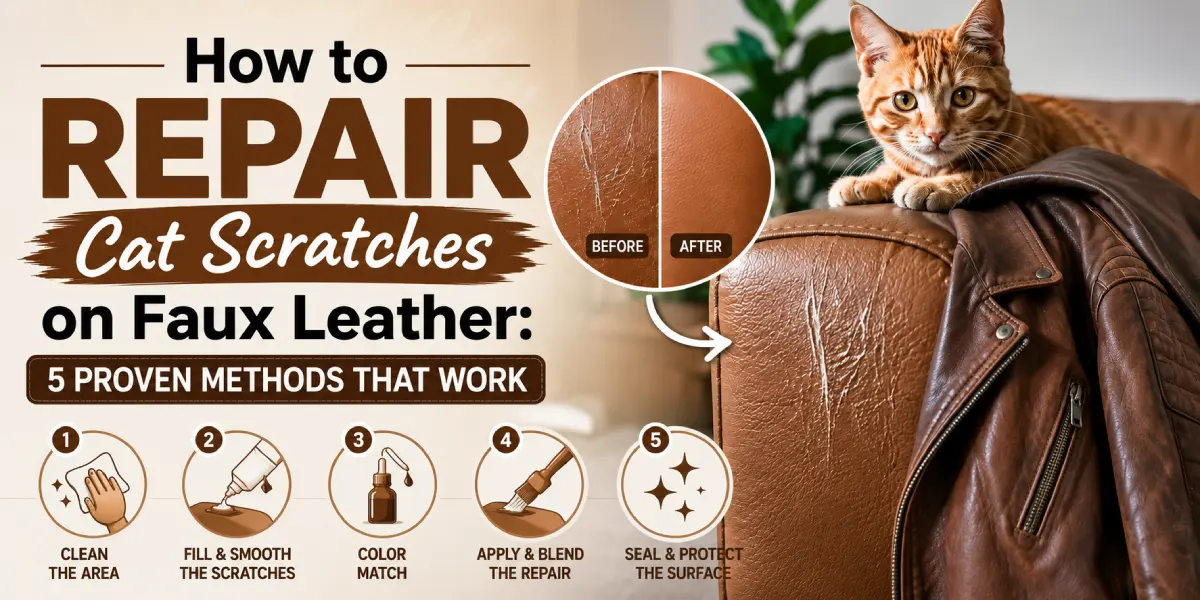
How to Repair Cat Scratches on Leather: 5 Proven Methods That Work
Cat scratches on your favorite leather jacket or faux leather couch don’t have to mean the end. Whether you’re dealing with minor surface marks or deeper claw damage, how to repair cat scratches on leather comes down to assessing the damage and choosing the right fix method. The good news? Most scratches can be repaired at home using simple, proven techniques that professionals actually use. If your leather jacket got caught by your cat, or your PU leather couch has visible claw marks, this guide shows you exactly what to do, from quick fixes that take 30 minutes to permanent solutions that last years.
Understanding Faux Leather Damage & Scratch Assessment
Before you start fixing anything, you need to know what you’re dealing with. Faux leather (also called PU leather, pleather, or vinyl) is different from real leather because it’s made of a plastic coating over a fabric backing. When a cat’s claws hit it, the damage looks different depending on how deep the scratches go.
Minor Surface Scratches vs Deep Claw Marks on PU Coating
Light scratches only damage the top color layer. When you run your wet finger over them, they might disappear temporarily. These are easy wins—you can fix them in minutes. Deep scratches, though, tear through the plastic coating and expose the fabric underneath. You’ll actually see white or tan fabric fibers showing. The worst damage? When the scratches go so deep that stuffing from the jacket or couch shows through.
Assessing Damage Depth: Testing Before You Treat
Here’s what experts recommend: clean the area with a soft cloth and water. Let it dry completely. Now rub your finger across the scratch. If you can barely feel it, it’s surface level. If you can feel the texture change or see fabric underneath, you’re dealing with medium damage. If the scratch is more than 2 inches long or you can see through to stuffing, that’s severe damage (you might want professional help for this). For comprehensive leather care prevention, learn more about Fix Scratched Leather at Home to protect your jacket from future damage.
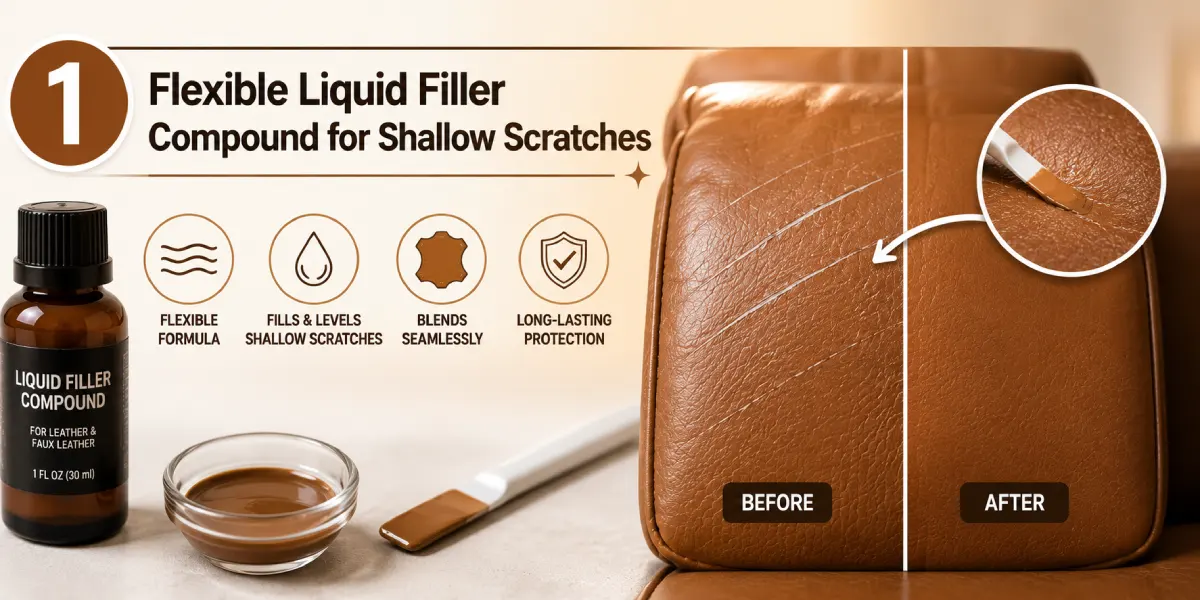
Method 1 – Flexible Liquid Filler Compound for Shallow Scratches
This is the most popular professional method used by leather restoration experts, and it works surprisingly well on faux leather jackets and furniture.
Applying Filler in Thin Layers: Curing & Sanding
Start by cleaning the scratch area with isopropyl alcohol on a cotton pad. This removes oils and dirt so the filler sticks properly. Let it dry for 5 minutes. Now apply your flexible liquid filler (brands like COLOURLOCK or Rub ‘n Restore work great). Here’s the key: use a small spatula or toothpick to apply the tiniest amount. Too much filler causes shrinkage as it dries. Build it up slowly with 2-3 thin coats instead of one thick coat. Wait 30 minutes between layers. After the final coat dries completely (check the product instructions), use fine-grit sandpaper (220-grit) and sand gently in circular motions until it’s smooth and level with the surrounding leather.
Color Matching & Texture Finishing
This part takes patience. Once the filler is smooth, you need to match the color. Most leather repair kits come with multiple color options. Test on a hidden spot first. Apply the color in thin layers using a small brush, letting each coat dry completely. Finish with a clear sealant to protect your work and restore the leather’s shine.
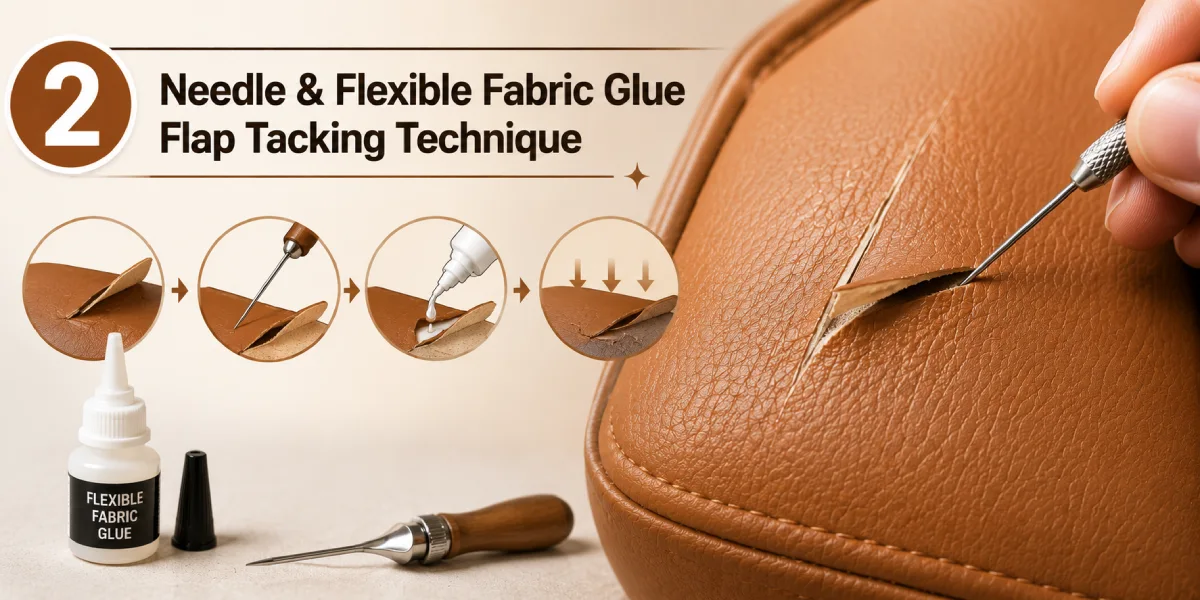
Method 2 – Needle & Flexible Fabric Glue Flap Tacking Technique
Reddit users and professional restorers swear by this method for catching damage early. It’s surprisingly effective.
Trimming Loose Fibers Without Expanding the Scratch
Use small, sharp scissors and carefully trim any loose or fuzzy fibers around the scratch. Don’t pull on the fibers, this makes the scratch bigger. Just snip the loose ends. Think of it like trimming a loose thread on your jacket.
Using Metal Needle to Anchor Lifted Fabric Down
Take a metal toothpick or needle and use a flexible fabric glue (not super glue—it’s too rigid). Apply a tiny drop of flexible glue to the needle, then carefully push any lifted fabric flaps back into place. Hold them down for 30 seconds. This is tedious work, but it prevents the damage from getting worse.
Sealing with Flexible Adhesive (Non-Rigid Bonding)
Once the flaps are tacked down, apply a thin layer of flexible adhesive over the whole area. This creates a foundation for any additional repair work and stops water from getting inside your jacket’s fabric backing.
Method 3 – Self-Adhesive Leather Repair Patches & Tape
This is the fastest method if you need results today. It’s perfect for leather jackets because patches are less noticeable on jackets than on large furniture surfaces.
Color Selection: Finding Your Exact PU Leather Shade
Self-adhesive patches come in 20+ colors. Black, brown, tan, and burgundy are most common for leather jackets. Order samples or check reviews to find your exact shade. A slightly darker match looks better than lighter—it blends into shadows. This step matters more than people think.
Patch Application & Pressure Bonding for Durability
Clean the scratch area thoroughly with isopropyl alcohol and let it dry completely. Cut your patch to size (about 1/2 inch larger than the damage on all sides). Peel the backing and press it on firmly, rubbing from the center outward to remove air bubbles. Leave it for 24 hours before using the jacket. Quality patches stick for months or years if applied correctly.
Method 4 – Leather Binder + Filler + Dye System (Professional Grade)
This is what professional restorers use when they want permanent, invisible repairs.
Stabilizing Vinyl Damage with Flexible Leather Binder
Apply a thin layer of leather binder (flexible leather glue) to the scratch using a cotton swab. This stabilizes lifted fibers and creates a strong foundation. Let it dry fully according to the product instructions, usually 2-3 hours.
Multi-Layer Filler Application & Sanding Process
Once the binder is dry, apply flexible filler compound in ultra-thin layers. Sand lightly between coats with 220-grit sandpaper. This takes patience. You’re essentially building up material until the scratch is level with the surrounding leather. Most repairs need 3-5 layers.
Recoloring & Sealing for Seamless Finish
After sanding smooth, apply the color carefully. Mix colors if your leather jacket has a unique shade. The final step is a clear protective sealant. This method produces nearly invisible repairs and lasts for years.
Method 5 – Sub-Patching for Deep Tears & Structural Damage
When Backing Fabric Support is Necessary
If scratches are deeper than 2 inches or show stuffing, the damage has gone through the backing fabric. This needs reinforcement from behind. Professionals apply a fabric patch behind the tear before filling and coloring the front.
Professional Restoration: Know When to Call an Expert
Some damage is just too extensive for DIY work. If your leather jacket damage involves multiple deep scratches, delamination (when the PU coating peels away from the fabric backing), or if the jacket is expensive, professional restoration might be worth it. Most cities have leather repair specialists who charge $50-150 per repair.
Critical Mistakes to Avoid on Bonded & PU Leather
Why Rigid Super Glue Causes Cracking on Flexible Materials
This is the biggest mistake people make. Regular super glue dries hard and rigid. When you wear your leather jacket or sit on your couch, the material flexes. Rigid glue cracks and fails. Always use flexible adhesive specifically designed for leather and vinyl.
Preventing Delamination from Over-Sanding
Don’t sand too aggressively. You can actually sand through the PU coating and expose the fabric backing, making the problem worse. Light sanding with fine-grit sandpaper is all you need.
The Bottom Line
How to repair cat scratches on leather depends on how bad the damage is. Minor scratches? Use flexible filler or self-adhesive patches. Deep tears? Try the binder and filler system or call a professional. The most important rule: use flexible products designed for synthetic leather, not rigid household glue. Your leather jacket is worth saving, and these proven methods actually work. Browse our collection of brown distressed motorcycle jacket if you love intentional texture and character.